
Intel Solid-State Drive Toolbox
The Intel Solid-State Drive Toolbox is drive management software that allows you to monitor your drive health, estimated drive life remaining, and S.M.A.R.T. Attributes. This SSD Toolbox can run quick and full diagnostic scans to test the read and write functionality of an Intel SSD.
This tool can optimize the performance of an Intel SSD using Trim functionality and update the firmware on a supported Intel SSD. You can check and tune your system settings for optimal Intel SSD performance, power efficiency, and endurance. This tool supports a Secure Erase of your secondary Intel SSD. If you are looking for a new SSD, here are a couple of SSDs from Amazon that seems like best sellers.
Intel SSD Toolbox supports viewing device information for hard disk drives as well as non-Intel SSDs too. You can use the data from the software to optimize performance in RAID 0 and update firmware accordingly. It also allows you to run a full diagnostic scan of the disk to analyze its read and write functionality.
Key Features:
- Monitor Drive health.
- Estimate SSD drive life.
- S.M.A.R.T. attributes even for non-intel drives.
- Trim functionality
- Performance boost feature.
- Most features are available for Intel SSD Drives
Download for: Windows | Mac | Linux (Free)
Final Thoughts
In this blog, we looked at the transportation problem and demonstrated the use of the IMSL C algorithm to solve both balanced and unbalanced transportation problems.
In our next blog, we’ll look at two special cases of the transportation problem, the assignment problem, and the transshipment problem.
Easily Solve the Transportation Problem With IMSL
Solving the transportation problem, regardless of the complexity, is much more surmountable with transportation algorithms included in IMSL.
Whether you’re working in C/C++, Fortran, Java, or Python, you can evaluate the IMSL library for your application free. Try it today via the link below.
Defining Problem Solving
Before we talk about the stages of problem solving, it’s important to have a definition of what it is. Let’s look at the two roots of problem solving — problems and solutions.
Problem – a state of desire for reaching a definite goal from a present condition
Solution – the management of a problem in a way that successfully meets the goals set for treating it
Problem solving on Wikipedia
One important call-out is the importance of having a goal. As defined above, the solution may not completely solve problem, but it does meet the goals you establish for treating it–you may not be able to completely resolve the problem (end world hunger), but you can have a goal to help it (reduce the number of starving children by 10%).
Tips, Common Mistakes and Further Practice
When it comes to answering questions about problem-solving skills, we recommend the following;
Do:
-
Select a strong example that truly demonstrates your problem-solving ability in a positive manner.
-
Choose examples that are relevant to the job you are applying for. If you are applying for a project-based position, give an example of how you resolved a problem with a work or academic project.
-
Be specific with your responses and use an example with enough detail to show how you approach situations and the way you think. Take the time to come up with possible answers and scenarios before the interview.
-
Make sure the problem is unique. If you have a problem, simply calling someone else to solve it is not impressive. The best answers will show tailored solutions to tasks that may seem mundane.
-
Make sure the problem is simple. If you have switched from a legal career to an engineering career and your problem is legal in nature, ensure your problem is easy to understand and explain it to your interviewer without using jargon.
Analyzing Your Results and Next Steps
You’ve taken your first MCAT diagnostic test, you’ve gotten your scores—now what?
- Review your answers—both the right answers and wrong answers. Take a look at any patterns that you see, then write them down. Acing biochemistry questions? Struggling with psychology and sociology? Circle any areas that you know you want to work on.
- Next, create a schedule using the information you’ve learned from your MCAT diagnostic test. This can be as simple as noting that on Wednesdays, you study organic chemistry (and wear pink). Or (better option!) you might choose to use one of Magoosh’s MCAT study schedules to cover the content areas you need in an organized, efficient way before test day.
- Then, it’s time to identify the best resources to help you achieve your goals. This can involve anything from taking an online course to working with a tutor, or some combination of methods. And, depending on when you took MCAT-related courses, you can focus on materials for one section, like Chemical and Physical Foundations of Biological Systems, or every section. We definitely recommend at least reviewing the materials you’ll see on all parts of the test. You don’t have to retake General Chemistry if it’s fresh in your mind, but looking at how the MCAT tests this will be important.
Resource Alert Try Magoosh’s MCAT Question of the Day and MCAT Sample Questions to get some extra practice!)
From MCAT Diagnostic Test to Full-Length Practice Tests
An MCAT diagnostic test can help lay the groundwork for your prep, but before your actual exam, it’s key to take at least one practice MCAT exam. The earlier you can start doing this, the better.
Trust me: I know it’s really easy to say, “My test isn’t until September; I’ll brush up on my bio and do it later.” But even once you’ve studied everything you need to know about the biochemical foundations of living systems (not to mention the biological foundations of behavior!), you still won’t build the endurance you need for test day until you sit down and put it to the (7.5-hour) test.
You can also check out this list of free MCAT practice tests! The AAMC store also offers the opportunity to bundle full-length exam purchases, as well. If you’re prepping for more than a week or two, we highly recommend getting more than one of these full-length practice tests; the savings can be big. Some bundles include the official guide and question packs that serve as section banks, as well.
As you get closer to your test date, your practice test scores will let you know if you are reaching your target score range. If you are way off from where you want to be, this can perhaps be helpful in a decision to postpone your test date.
If test day is quickly approaching and you don’t have time for full-length practice tests, the AAMC question packs are a great resource to work on individual sections you’ve flagged in your diagnostic test. Topics include biology, chemistry, physics, a CARS diagnostic, Critical Analysis and Reasoning Skills, and question banks containing mixtures of MCAT sample questions.
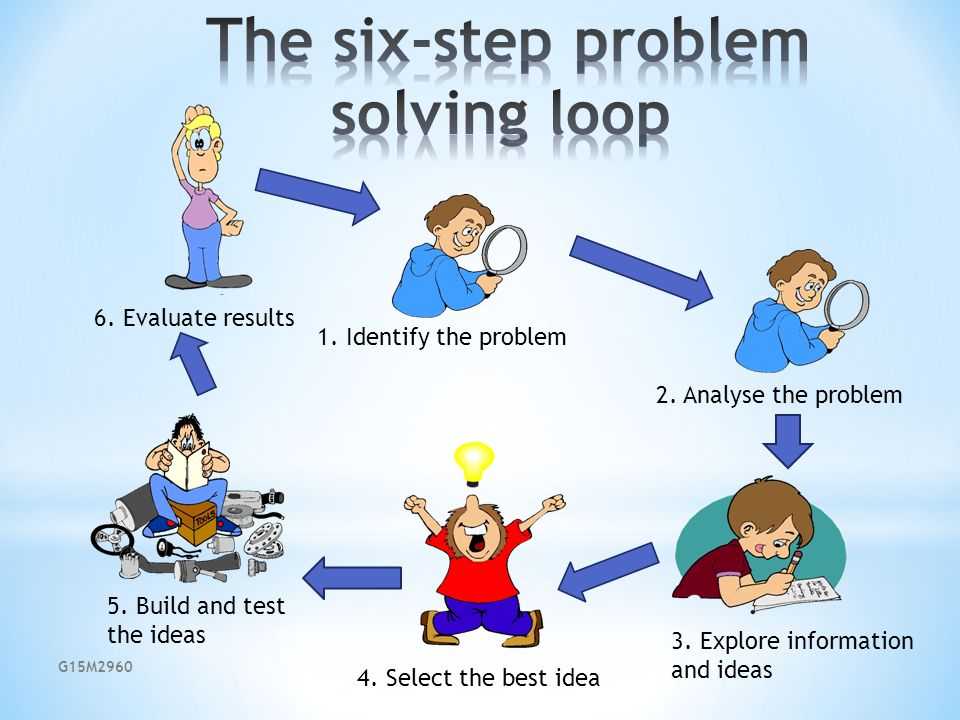
The SIX Processes To Solving A Problem
After the sleep, it is better to split the problem into smaller problems and begin solving it step by step. It is realistic when you do this and write the processes down, as you would very soon begin to see the possible solutions that underlie within each problem. This procedure helps you identify the best solution embedded within each problem


After writing it down, the next step in our hypothetical problem is to identify pain points, if any, and identify the connections between the connecting pain points. This would help you understand the problem better, then take on the objectives, and translate them into structured programs.
Thirdly, it is advised that you reflect on the possible solutions, while consulting friends and relatives. At the same time, also conduct a strategic analysis and begin to tailor solutions according to their feedback and sentiments. This would eventually result in deeper penetration and a larger perception of the whole problem
Stage number four is to evaluate all possible solutions. In other words, reviewing the problem, point by point, while analyzing the pros and cons of each possible solution.
The next step or stage number five is when you implement the decision.
Last of all or stage number six, is post-decision justification or evaluation of the outcome. Of course, this also means the implementation of any follow-up actions required.
Unfortunately, it is only when you encounter or run into problems, only then, these so-called strategies materialize. In other words, it is only when you start visualizing the problem mathematically, you begin to analyze what the problem really is, and start approaching it in an organized and logical manner. Then the whole problem becomes easier to solve.
Conclusion
Problems need to be solved or else they could develop into an even worse situation. However, you do not have to take them head on and at most times it is a lot easier than struggling with it.
To put it in a different way, “you should fight your own battles, but that doesn’t mean you should fight all of your battles on your own.”
Also, do not ever try to perceive the problem bigger than it actually is, and the actual problem is only as big as you perceive it to be. So, once you visualize yourself to be bigger than the problem itself, it tends to provide a positive outlook, towards solving the problem
Once you find a solution to a problem, the feeling and satisfaction of solving it is so great that explaining it has just no words.
The most successful lives are the ones that who face up to their issues and problems, and effectively manage and solve their problems.
So, face each problem as a challenge, and consider each mistake as an experience. That is to say, challenges help us grow, and with the process of growth, we gain experience.
In short, the best way to escape a problem is to solve it.
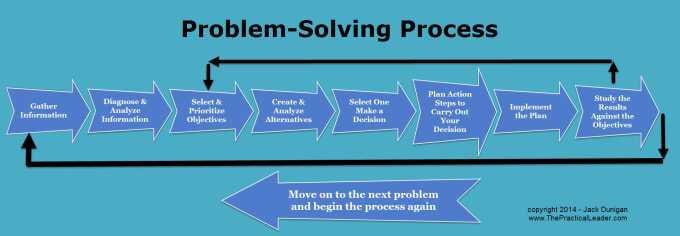
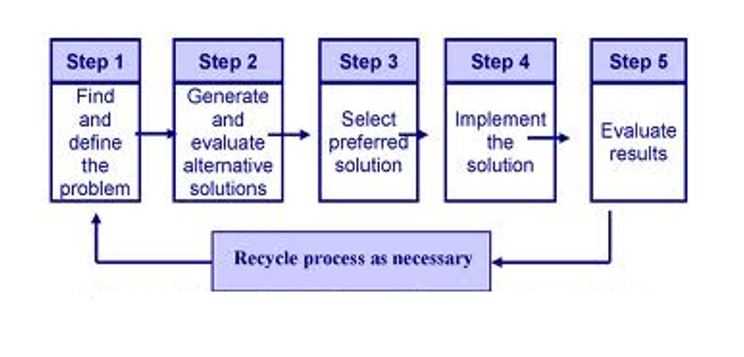
The Five Steps of Problem Solving
With that understanding of problem solving, let’s talk about the steps that can get you there. The five problem solving steps are shown in the chart below:
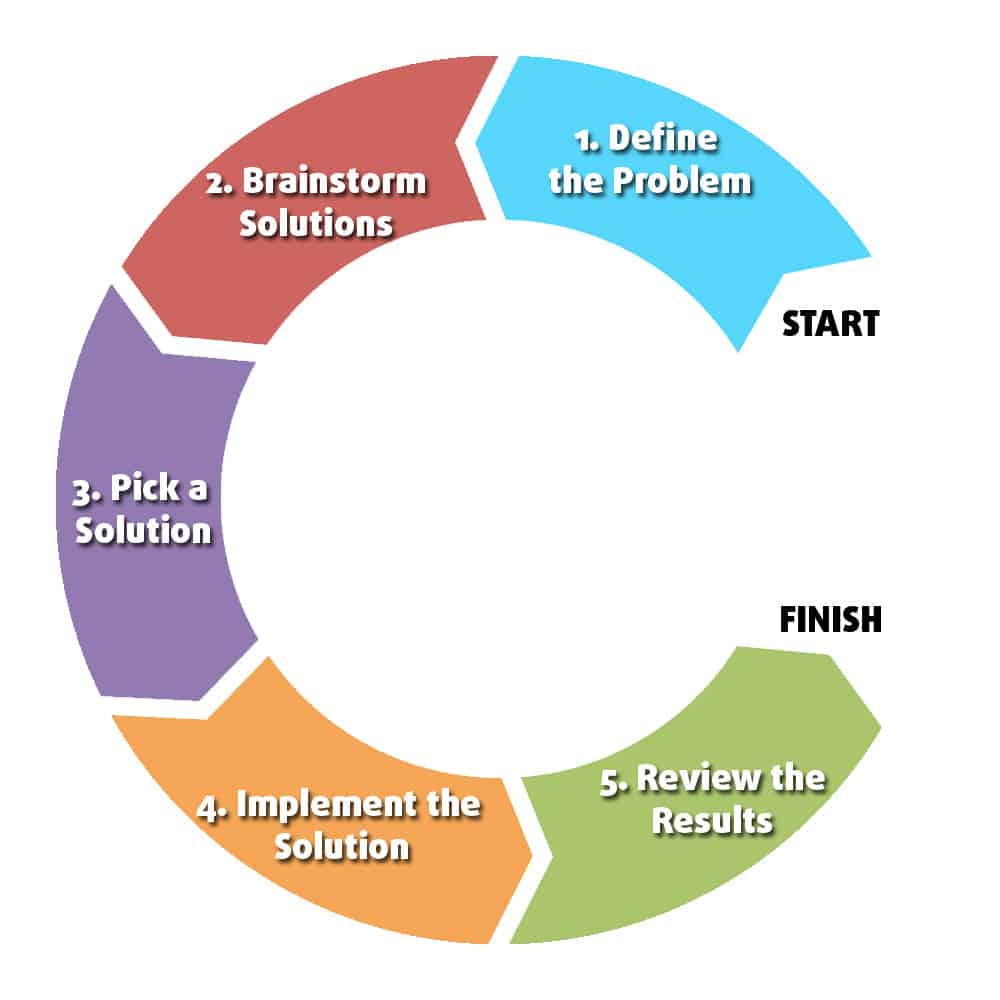
However this chart as is a little misleading. Not all problems follow these steps linearly, especially for very challenging problems. Instead, you’ll likely move back and forth between the steps as you continue to work on the problem, as shown below:
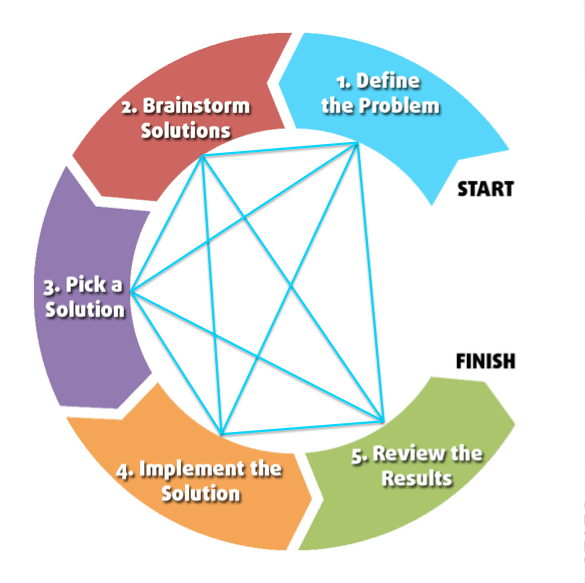
Let’s explore of these steps in more detail, understanding what it is and the inputs and outputs of each phase.
1. Define the Problem
aka What are you trying to solve? In addition to getting clear on what the problem is, defining the problem also establishes a goal for what you want to achieve.
Input: something is wrong or something could be improved.Output: a clear definition of the opportunity and a goal for fixing it.
2. Brainstorm Ideas
aka What are some ways to solve the problem? The goal is to create a list of possible solutions to choose from. The harder the problem, the more solutions you may need.
Input: a goal; research of the problem and possible solutions; imagination.Output: pick-list of possible solutions that would achieve the stated goal.
3. Decide on a Solution
aka What are you going to do? The ideal solution is effective (it will meet the goal), efficient (is affordable), and has the fewest side effects (limited consequences from implementation).
Input: pick-list of possible solutions; decision-making criteria.Output:decision of what solution you will implement.
4. Implement the Solution
aka What are you doing? The implementation of a solution requires planning and execution. It’s often iterative, where the focus should be on short implementation cycles with testing and feedback, not trying to get it “perfect” the first time.
Input: decision; planning; hard work.Output: resolution to the problem.


5. Review the Results
aka What did you do? To know you successfully solved the problem, it’s important to review what worked, what didn’t and what impact the solution had. It also helps you improve long-term problem solving skills and keeps you from re-inventing the wheel.
Input: resolutions; results of the implementation.Output: insights; case-studies; bullets on your resume.
Specimens for the diagnosis of SARS-CoV-2 infection
Optimal specimens for the detection of current infection with SARS-CoV-2 are collected from the upper respiratory tract (e.g. nasopharyngeal swab, oropharyngeal swab, nasopharyngeal aspirate, nasal wash) or if the patient is hospitalised or in intensive care, also from the lower respiratory tract (e.g. bronchoalveolar lavage (BAL), endotracheal aspirate (ETA), expectorated sputum).
Saliva can also be considered as a specimen when testing for SARS-CoV-2. Available data suggests that only assays detecting SARS-CoV-2 RNA should be used for this specimen type as the sensitivity of antigen tests is not sufficient. For further details, see the ECDC technical report Considerations for the use of saliva as sample material for COVID-19 testing.
Respiratory specimen collection from the upper and in particular lower respiratory tract should be performed under heightened infection prevention and control measures (airborne precautions) in accordance with ECDC guidance on Infection prevention and control and preparedness for COVID-19 in healthcare settings.
Specimens for laboratory testing should be collected early in the infection. High viral loads have been detected at or shortly after symptom onset and they tend to decrease afterwards. In more severe cases viral load is significantly higher (see also COVID-19 latest evidence from ECDC on viral shedding and viral load).
ECDC has published a guidance for discharge and ending isolation in the context of widespread community transmission of COVID-19 including testing recommendations to end isolation.
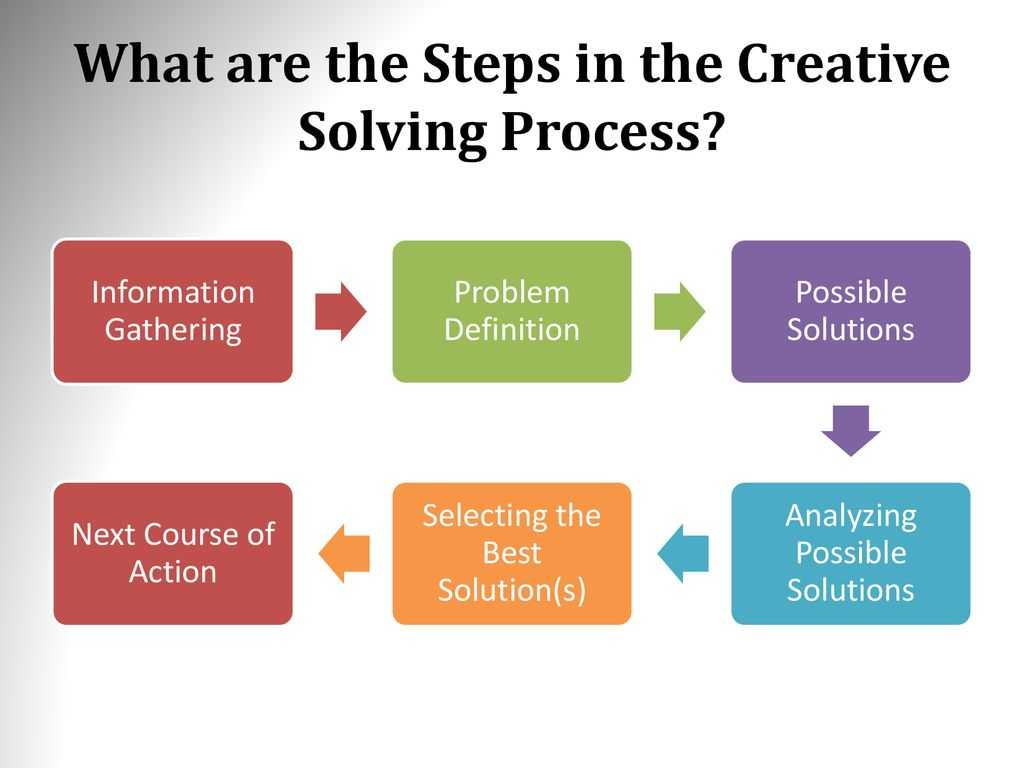
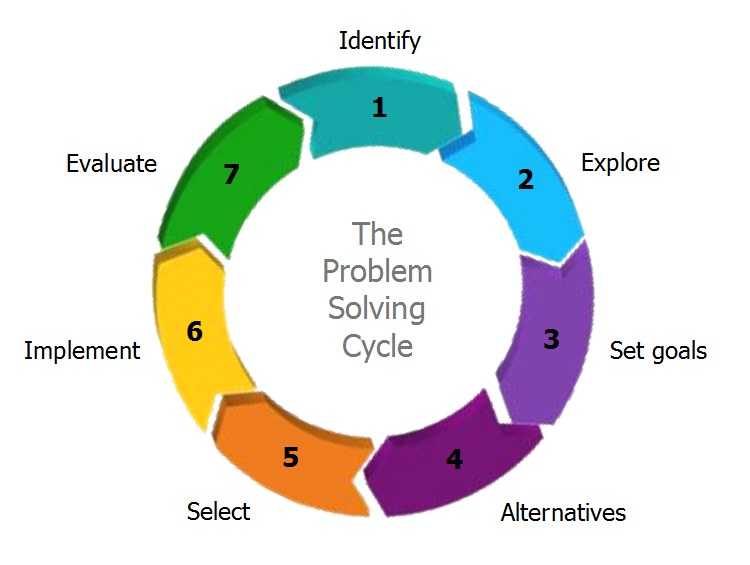
Stages of Problem Solving
Effective problem solving usually involves working through a number of steps or stages, such as those outlined below.
Problem Identification:
This stage involves: detecting and recognising that there is a problem; identifying the nature of the problem; defining the problem.
The first phase of problem solving may sound obvious but often requires more thought and analysis. Identifying a problem can be a difficult task in itself. Is there a problem at all? What is the nature of the problem, are there in fact numerous problems? How can the problem be best defined? By spending some time defining the problem you will not only understand it more clearly yourself but be able to communicate its nature to others, which leads to the second phase.
Structuring the Problem:
This stage involves: a period of observation, careful inspection, fact-finding and developing a clear picture of the problem.
Following on from problem identification, structuring the problem is all about gaining more information about the problem and increasing understanding. This phase is all about fact finding and analysis, building a more comprehensive picture of both the goal(s) and the barrier(s). This stage may not be necessary for very simple problems but is essential for problems of a more complex nature.
Looking for Possible Solutions:
During this stage you will generate a range of possible courses of action, but with little attempt to evaluate them at this stage.
From the information gathered in the first two phases of the problem solving framework it is now time to start thinking about possible solutions to the identified problem. In a group situation this stage is often carried out as a brain-storming session, letting each person in the group express their views on possible solutions (or part solutions). In organisations different people will have different expertise in different areas and it is useful, therefore, to hear the views of each concerned party.
Making a Decision:
This stage involves careful analysis of the different possible courses of action and then selecting the best solution for implementation.
This is perhaps the most complex part of the problem solving process. Following on from the previous step it is now time to look at each potential solution and carefully analyse it. Some solutions may not be possible, due to other problems like time constraints or budgets. It is important at this stage to also consider what might happen if nothing was done to solve the problem — sometimes trying to solve a problem that leads to many more problems requires some very creative thinking and innovative ideas.
Finally, make a decision on which course of action to take — decision making is an important skill in itself and we recommend that you see our pages on decision making.
Implementation:
This stage involves accepting and carrying out the chosen course of action.
Implementation means acting on the chosen solution. During implementation more problems may arise especially if identification or structuring of the original problem was not carried out fully.
Monitoring/Seeking Feedback:
The last stage is about reviewing the outcomes of problem solving over a period of time, including seeking feedback as to the success of the outcomes of the chosen solution.
The final stage of problem solving is concerned with checking that the process was successful. This can be achieved by monitoring and gaining feedback from people affected by any changes that occurred. It is good practice to keep a record of outcomes and any additional problems that occurred.
For more details on the stages of problem solving continue to Identifying and Structuring Problems.
PC Hardware Check FAQ
How to check my computer specs for hardware?
You can check computer PC specs for hardware by using this simple guide:
- Press Win + I keys to open the Settings window and select System.
- In the Settings window, scroll down the left sidebar and select About.
- Then you can find hardware specs include RAM, processor, and system type under Device specifications.
What graphics card do I have on my PC?
You can check the GPU information through the steps below:
- Press Win + R key to open the Run box, and then type dxdiag in it and hit Enter.
- When the DirectX Diagnostic Tool opens, go to the Display
- You can see the information about your graphics card shown in the Device
What type of RAM do I have?
You can use Command Prompt to check your RAM type. Here’s how:
- Type cmd in the search box, and then right-click the Command Prompt and select Run as Administrator.
- Type the wmic MemoryChip get MemoryTypein the elevated command prompt and hit Enter.
How to run a benchmark test on Windows 10?
- Press Win + R key to open the Run box, and then type perfmon in it and hit Enter.
- In the Performance Monitor window, navigate to Data Collector Sets > System > System Performance.
- Right-click System performance and select Start from the context menu.
- Once the process completes, click on Reports > System > System Performance from the left pane.
- Double click the System Performance Report section and you will see an overall system performance summary.
SsdReady
Do you ever wonder how long your SSD is going to last? This is a tool you must have to install on your computer and let it run in the background. This tool track daily Writes and the total usage of your SSD on a daily basis. SSDReady tool can predict how long your SSD going to live. This will give you enough time to prepare and shop around for the next SSD.


![Top 8 ssd tools to check ssd health and performance [minitool tips]](https://oksimetr.ru/wp-content/uploads/d/a/0/da030786843759f8567159c10e4de0bc.jpeg)

![How to fix diagnostics policy service is not running error [internet problem]](https://oksimetr.ru/wp-content/uploads/2/6/4/26498db173b2f8cfa0503fcf1e0492ff.jpeg)

![Pc hardware check on windows 10: here are best diagnostic tools [partition manager]](https://oksimetr.ru/wp-content/uploads/0/1/1/011838d1c042346d9644a6471518f6b4.jpeg)
In addition to this, this Solid Disk tool can feedback you what to optimize if it finds too many disks writes, to extend your SSD life. SSDReady comes with all the required third-party components to give you the most accurate readings. It is very simple to use and has a user-friendly classical window interface. You can start an SSD test and analysis with one click.
You can set SSDReady to run automatically with each Windows startup or run it manually. In any case, it will not consume much system resources. The software has a PRO version as well, which gives you more data about your SSD drives.
Key Features:
- Drive details (Trim support, Firmware, etc.)
- Predict lifetime of SSD
- Support most of the SSD Drives
- Optimize write performance
- Works with Windows XP and above versions
- PRO edition available for detailed SSD health check
Download for: Windows
SSDs are more fragile than HDs when you compare the lifespan. However, these lifetime monitor tools let you check the performance and lifespan of the drive. For Mac users, there are not many tools available to maintain and check performance for SSD. Most of the tools are build for Windows users. However, we listed the best SSD Tools for Mac to Maintain SSD Drive.
There are several tools available to Tweak SSD or enable TRIM on SSD to improve performance. These tools are recommended to use if you see any performance issue while working on your system with SSD. There are SSDTweker and TRIM Enabler to try on your SSD for performance improvement and we provided the list of tools on Tools to Tweak SSD article.
Once you made up your mind to buy SSD, please see our recommended list of SSDs for Mac, if you own a Windows system, please refer the list for best Solid State Drives for Windows. It is always better to keep an eye on your SSD. Install at least one SSD health monitoring tool for your laptop. To be safe, keep a backup disc for the entire system. Backup up your computer once in a month or a week based on your computer use.
Wrapping Up
Keeping a check on your hard disk health helps prevent the loss of irreplaceable files. After all, a failure could happen at any time.
Are Microsoft’s default apps causing Windows 11 not to respond? Learn how to fix this issue. Not sure Windows 11 is right for you? Find out how to downgrade.
Never Miss Out
Receive updates of our latest tutorials.
Crystal Crowder
Crystal Crowder has spent over 15 years working in the tech industry, first as an IT technician and then as a writer. She works to help teach others how to get the most from their devices, systems, and apps. She stays on top of the latest trends and is always finding solutions to common tech problems.
Key Features
- Compatible with all PC-based scan tools sold on this website
- Supports all OBD-II compliant vehicles, including EOBD and JOBD vehicles
- Customizable dashboards
- Fuel economy MPG or km/l calculation
- Real-time dashboard display including multiple trip meters
- Real-time plotting of all PID values
- Recording and playback of monitored data
- Data logging to csv format
- Reading and clearing diagnostic trouble codes
- Display battery voltage
- Read freeze frame data
- Day-time and night-time display
- Create custom day- and night-time skins
- English and Metric units
- Statistical calculations including min, max, and mean values
- Over 90 supported PIDs
- Full control over polling rates and priorities
- Displays vehicle information including VIN number and calibration ID
- OBD console for sending commands directly to the vehicle
- Designed for single and multi-core processors
- Free unlimited updates*
* Updates are free and unlimited for all releases with the same major version number
Running System Tests in Windows
The System Tests check the hardware subsystems to ensure they are functioning properly.
If a component fails a test, do the following:
-
Click Troubleshoot.
-
Follow the on-screen instructions to attempt to resolve the problem, and then click
Yes. -
If the problem is not resolved, click Yes to contact HP Customer Support.
-
Write down or copy the failure ID (24-digit code) and product ID for when you contact
HP Customer Support. The information
is also available in Test Logs on the main menu. -
If your computer is online, click NEXT to go to the HP Customer Support website.
If your computer is offline, use your mobile device to scan the provided QR Code and
access HP Customer Support.
Running the HP PC Hardware Diagnostics Fast Test (about 4 minutes)
Open HP PC Hardware Diagnostics and run the Fast Test.
The Fast Test performs a fast check of your system to make sure the main components
are functioning properly. The Fast Test
is separated into a 1st pass and 2nd pass, with each pass running multiple tests.
The Fast Test includes:
-
Battery check
-
Processor check
-
Wireless module check
-
System board check
-
Hard drive SMART check
-
Hard drive short DST check
-
Memory quick check
-
Hard Drive Optimized DST check
-
Video memory check
You cannot use your computer during the test. This test takes 3 to 5 minutes or more
to complete, depending on the system
configuration. You can cancel at any time by pressing the esc key (Escape).
![Lenovo diagnostics tool – here’s your full guide to use it [minitool tips]](https://oksimetr.ru/wp-content/uploads/4/8/7/487abfe018fe368a28102539c97a8938.jpeg)


-
In Windows, search for and open the HP PC Hardware Diagnostics for Windows app.
If this app is not on your computer, download the latest version from the HP Hardware Diagnostics website.
-
On the main menu, click System Tests.
-
Click the System Fast Test tab.
-
Click Run once.
While the test is running, the time remaining and test result for each component displays
on the screen. -
Do one of the following, depending on the test result.
-
If a component fails a test, do the following:
-
Click Troubleshoot.
-
Follow the on-screen instructions to attempt to resolve the problem, and then click
Yes. -
If the problem is not resolved, click Yes to contact HP Customer Support.
-
Write down or copy the failure ID (24-digit code) and product ID for when you contact
HP Customer Support. The information
is also available in Test Logs on the main menu. -
If your computer is online, click NEXT to go to the HP Customer Support website.
If your computer is offline, use your mobile device to scan the provided QR Code and
access HP Customer Support.
-
-
If no test fails, click Continue, and then click Run once to run the 2nd Pass of the System Fast Test.
-
If no system component failed, run the Extensive Test.
Running the HP PC Hardware Diagnostics Extensive Test (2 hours or more)
Open HP PC Hardware Diagnostics and run the Extensive Test.
Run the Extensive Test if no system component failed during the Fast Test. This test
can take 2 or more hours to complete.
The Extensive Test includes:
-
Battery check
-
Processor check
-
System board check
-
Hard drive SMART check
-
Hard drive short DST check
-
Hard drive optimized DST check
-
Hard drive long DST check
-
Memory extensive check
-
Video memory check
You cannot use your computer during the test. The Extensive Test takes 2 or more hours
to complete, depending on the system
configuration. You can cancel at any time by pressing the esc key (Escape).


-
In Windows, search for and open the HP PC Hardware Diagnostics for Windows app.
If this app is not on your computer, download the latest version from the HP Hardware Diagnostics website.
-
On the main menu, click System Tests.
-
Click the System Extensive Test tab.
-
Click Run once.
While the test is running, the time remaining and test result for each component displays
on the screen. The test can take
2 or more hours to complete. -
If a component fails a test, click Troubleshoot.
-
Follow the on-screen instructions to attempt to resolve the problem, and then click
Yes. -
If the problem is not resolved, click Yes to contact HP Customer Support.
-
Write down or copy the failure ID (24-digit code) and product ID for when you contact
HP Customer Support. The information
is also available in Test Logs on the main menu. -
If your computer is online, click NEXT to go to the HP Customer Support website.
If your computer is offline, use your mobile device to scan the provided QR Code and
access HP Customer Support.
If the Extensive Test does not detect a hardware problem, run the Component Tests.


